Apache stands out as a globally acclaimed web server, recognized for its open-source nature and cross-platform compatibility. Serving a substantial portion of the Internet’s websites, Apache boasts extensive capabilities, which can be enhanced through supplemental modules, making it an ideal choice for those seeking a customizable and adaptable web server.
This guide walks you through the steps of installing and administering the Apache web server on Ubuntu 22.04. Gain insights into Apache installation, configuration of HTTP and HTTPS ports in the firewall, and the establishment of virtual hosts.
On Ubuntu and Debian systems, the Apache package and the service are called apache2.
Apache is included in the default Ubuntu repositories, and the installation is pretty straightforward.
Run the following commands to refresh the local package index and install Apache:
sudo apt update
sudo apt install apache2
After the installation process is finished, the Apache service will start automatically.
sudo systemctl status apache2
The output should tell you that the service is running and enabled to start on system boot:
apache2.service - The Apache HTTP Server
     Loaded: loaded (/lib/systemd/system/apache2.service; enabled; vendor preset: enabled)
     Active: active (running) since Thu 2023-12-21 11:49:51 UTC; 1min 9s ago
       Docs: https://httpd.apache.org/docs/2.4/
   Main PID: 3134 (apache2)
      Tasks: 55 (limit: 4558)
     Memory: 5.0M
        CPU: 29ms
     CGroup: /system.slice/apache2.service
             ├─3134 /usr/sbin/apache2 -k start
             ├─3136 /usr/sbin/apache2 -k start
             └─3137 /usr/sbin/apache2 -k start
Apache has been successfully installed on your Ubuntu 22.04 server. You can now start using it.
Apache listens on port 80 (HTTP) and 443 (HTTPS). You need to open the necessary firewall ports to allow access to the web server from the Internet.
Assuming you are using UFW , you can do that by enabling the ‘Apache Full’ profile, which includes rules for both ports:
sudo ufw allow 'Apache Full'
Verify the change:
sudo ufw status
The output should look something like this:
Status: active

To                         Action      From
--                         ------      ----
22/tcp                     ALLOW       Anywhere
Apache Full                ALLOW       Anywhere
22/tcp (v6)                ALLOW       Anywhere (v6)
Apache Full (v6)           ALLOW       Anywhere (v6)
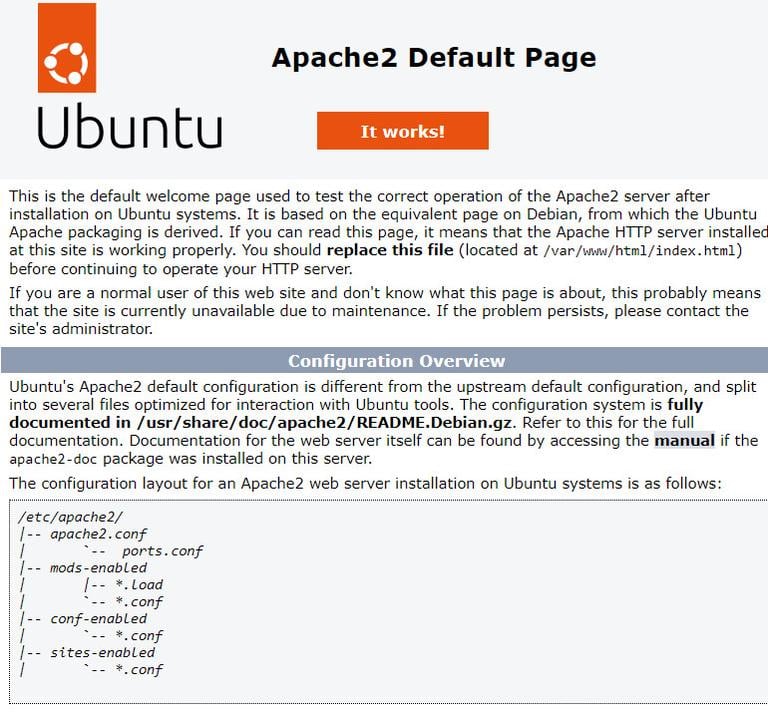
To verify that everything works correctly, open your browser, type your server IP address http://YOUR_IP_OR_DOMAIN/, and you will see the default Ubuntu 22.04 Apache welcome page as shown below:

The page provides basic information about Apache configuration files, relevant helper scripts, and directory locations.
A Virtual Host is an Apache configuration directive that allows you to run more than one website on a single server. Typically, a virtual host describes one website.
Apache ships with one virtual host enabled by default. All domains that point to the server IP address will match the default virtual host. If you are hosting a single website, you can upload its content in /var/www/html and edit the virtual host configuration found in the /etc/apache2/sites-enabled/000-default.conf file.
If you plan on hosting multiple websites, you will need to create a virtual host configuration for each site. In this section, we will guide you through setting up a website for a domain named “example.com”. Simply replace “example.com” with your own domain name.
The first step is to create the document root directory where the website files for the domain name will be stored and served in response to requests.
Run the following command to create the directory :
sudo mkdir -p /var/www/example.com
For testing purposes, create an index.html file inside the domain document root directory:
/var/www/example.com/index.html
<!DOCTYPE html>
<html lang="en" dir="ltr">
  <head>
    <meta charset="utf-8">
    <title>Welcome to example.com</title>
  </head>
  <body>
    <h1>Success! example.com home page!</h1>
  </body>
</html>
Save and close the file when you are done.
To avoid permission issues, change the ownership of the domain document root directory to the apache user (www-data):
sudo chown -R www-data: /var/www/example.com
The next step is to create a virtual host configuration for the “example.com” domain. The best practice is to store each vhost configuration in a separate file.
Apache vhosts files are stored in /etc/apache2/sites-available directory. The standard naming convention is to name the file according to the domain.
Open your text editor and create the following file:
/etc/apache2/sites-available/example.com.conf
<VirtualHost *:80>
    ServerName example.com
    ServerAlias www.example.com
    ServerAdmin webmaster@example.com
    DocumentRoot /var/www/example.com/public_html

    <Directory /var/www/example.com/public_html>
        Options -Indexes +FollowSymLinks
        AllowOverride All
    </Directory>

    ErrorLog ${APACHE_LOG_DIR}/example.com-error.log
    CustomLog ${APACHE_LOG_DIR}/example.com-access.log combined
</VirtualHost>
Apache does not read the configuration files found in the /etc/apache2/sites-available directory unless they are linked to the /etc/apache2/sites-enabled directory.
To activate the virtual host configuration, create a symlink using the a2ensite utility:
sudo a2ensite example.com
Test the configuration for any syntax errors with:
sudo apachectl configtest
If there are no errors, you will see the following output:
Syntax OK
Restart the Apache service for the changes to take effect:
sudo systemctl restart apache2
Finally, to verify that everything is working as expected, open http://example.com in your browser, and you will see something like this:
